Professional picture often have a peculiar magic that lead our eyes to what is most important in them. Everytime we see a professional picture or a picture with a certain degree of technique, we immediately think, “wow! That is a nice photo”. However, we don’t always recognized the principles and basic rules that made these pictures look so nice among their other qualities. There are a few steps to consider before taking pictures, and these steps can improve the quality of the pictures, the focus and much more. We don’t always need a very expensive camera to take a good photo. Using a camera phone might suffice if we know the basic steps to take. In this post we will talk about Rule of Thirds, Leading Lines, and Depth of Field techniques that can make our pictures look awesome.
Rule of Thirds

Photo “Martinho pescador” by Jean Beaufort

The picture above is in the public domain and the author used the rule of thirds technique to focus on the main element which is the bird. By dividing the image in nine squares, two vertical and two horizontal lines, he was able to capture the beauty of the bird. For the technique to be effective the lines need to cross the element that the author wants to focus on. We see that the lines are crossing on top of the bird’s neck and close to his belly. By using this technique he was able to bring balance and focus to the picture.

Photo by Mariana Barnett

The picture above was taken by myself with an iphone camera. This picture was taken during the “golden hour”, around 4:30pm when the sun starts to go down in the winter time. The beautiful natural light from the Sun is shining on the shoes without the need of photoshop. I followed the steps of the first picture of the bird by applying the rule of thirds. I divided the image in nine squares and position the camera to make sure that the lines would cross on top of the shoe on the right. Applying this rule helped to bring balance and focus to the main element on the picture. The light of the Sun also helped to focus and bring life to the picture.
Leading Lines

Hamburg Germany Canal Night Time Romantic Sunset . Public domain. No atributtions found
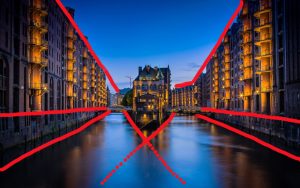
The picture above was taken in Hamburg, Germany. It is a public domain image displaying the use of leading lines. The canal and the buildings on the sides follow leading lines to the center of the image. This symmetry adds beauty and elegance to this photo. We see by the red highlights lines drawn over the picture that the top of the buildings as well as the sides of the buildings follow lines to the end of the canal . In the center of the image there is another building that has two pathways one on either side. The leading lines cross in some areas as they reach for these two pathways The lines from above the buildings going down also point towards the pathways on the sides of the center building. Leading lines are used powerfully in this image to display its contents .

Photo by Mariana Barnett
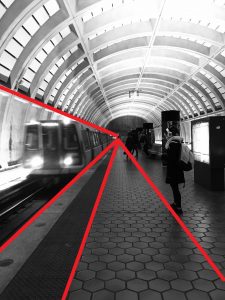
This picture above is my own rendition, also taken with an iphone, of leading lines technique at the metro to follow the previous example . As we can see by the red line draw overs there are leading lines in this image going to the back of the tunnel. In both images the purpose of the leading lines isn’t necessarily to focus the eyes of the viewer on a target, but rather “on a journey through the scene”link. We can see lines leading from the top of the train to the side of the train leading to the back of the tunnel. We can also see a line formed by people waiting for the trains arrival. This particular line is diagonal also leading to the back of the tunnel, which is interesting because it’s formed by people. Both examples of the leading line images are following a pattern and were taken at night using artificial lights to make the picture look nice. Our eyes automatically follow the lines and gives a sense of adventure.
Depth of Field

Photo by Matt, Shanya and Ben. Public domain. No further information found.

The picture above was also taken by a professional and is public domain. This image follows the principles of depth of field imagery. The focus being a section of a wood being cut by saw. The background behind this wood tip and saw is not too blurry to not see that there are different objects other than the main elements of the picture. By using this technique, the author of the picture was able to create depth and focus on the image. Our eyes can naturally recognized all the elements of the picture and separate them by order of importance. This gives a look of professionalism and a three dimensional situation as almost showing that the picture is alive.

Photo by Mariana Barnett

This picture was taken by myself with an iphone at my work. This image also follows the principles of depth of field imagery. I was able to follow the steps of the first example by focusing my camera on the main objects of the picture which are these two pink dumbbells, while the rest of the image is blurry. The blurry background hints at other things behind the image, but focuses the viewer on the objects of interest in the center.
Conclusion:
There are many different techniques that can be applied to images. We don’t always need the perfect camera, but using the right methods and making sure the lighting is good can help produce high quality images and focus in the viewers attention in the desired direction. Many techniques may conflict so it is best to utilize them sparingly as needed. By using the rule of thirds, leading lines, or depth of field a picture taker is able to improve the professionalism of his pictures and continue to learn apply basic powerful techniques.
0 Comments